ブラウザでRSA暗号化したデータをサーバで復号する(Angular + JSEncrypt、Spring MVC)【後編】
前回の続きです。
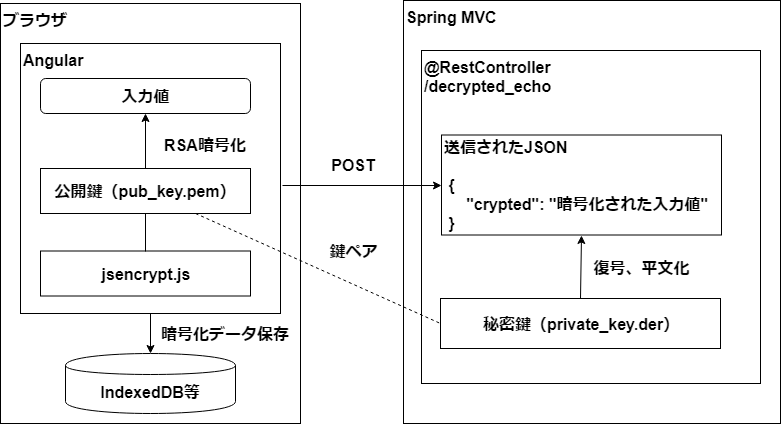
重要なデータがスマホに平文で残らないようにします。

環境
- Windows 10
- Visual Studio Code 1.35
- Node.js 10.16.0
- Angular 8.1.0
クライアント(Angular側)実装
Angular8で新規プロジェクト雛型を作ります。
Angularはnpm install @angular/cli -gでグローバルに入れてもいいですが、ローカルに入れた方が後で後悔が少ないと思います。ローカルでangularのバージョンを使いまわすのは以下の記事でやっています。
Angularプロジェクト作成
C:\src\js\angular-pj> ng new crypted-rest-clientjsencryptをnpmインストール
JSでの暗号化ライブラリは「crypto-js」が最もメジャーですが、jsencryptは使い方が非常に簡単なので今回はこれを使います。
C:\src\js\angular-pj\crypted-rest-client>npm install jsencrypt

+ jsencrypt@3.0.0-rc.1
added 1 package from 3 contributors and audited 17111 packages in 32.373s
found 0 vulnerabilities
rc(Release Candidate:リリース候補)が入ってしまいましたが検証なので気にしないことにします。
app.component.htmlを編集
デフォルトで作られたsrc/app/app.component.htmlを編集して簡単な入力フォームを作ります。
<!--The content below is only a placeholder and can be replaced.-->
<div style="text-align:center">

    <input type="text" [(ngModel)]="email" />
    <input type="password" [(ngModel)]="password" />
    <input type="button" value="送信" (click)="login()" />

    <router-outlet></router-outlet>
</div>
app.modules.tsを編集
inputに相互バインド指定子[(ngModel)]を付けられるようにFormsModuleを、HTTP通信が出来るようにHttpClientModuleを追加します。
import { BrowserModule } from "@angular/platform-browser";
import { NgModule } from "@angular/core";

// 追加
import { FormsModule } from "@angular/forms";
import { HttpClientModule } from "@angular/common/http";

import { AppRoutingModule } from "./app-routing.module";
import { AppComponent } from "./app.component";

@NgModule({
    declarations: [AppComponent],
   // 追加
    imports: [BrowserModule, AppRoutingModule, HttpClientModule, FormsModule],
    providers: [],
    bootstrap: [AppComponent]
})
export class AppModule {}
app.component.tsを編集
公開鍵(public_key.pem)はフィールドに持たせています。
(raw-loaderがAngular8でちゃんと動いてくれなかった、要調査)
HTTPアクセスするSpring MVCのRESTは復号する方の/decrypted_echoです。
import { Component } from "@angular/core";
import { HttpClient, HttpHeaders } from "@angular/common/http";
import * as JsEncryptModule from "jsencrypt";

@Component({
    selector: "app-root",
    templateUrl: "./app.component.html",
    styleUrls: ["./app.component.scss"]
})
export class AppComponent {
    title = "crypted-rest-client";
    email: string;
    password: string;

    private pubKey = `-----BEGIN PUBLIC KEY-----
MIIBIjANBgkqhkiG9w0BAQEFAAOCAQ8AMIIBCgKCAQEA2+Fc2zmCbeIj8voLIVjv
Hccc/6JdlZcUQWAGcFmAC05sHNwVA56tYobfFv+mnbu8rT0tmPxQNXY3VCDcwm6Y
n57rfFlTfvSXqUyaf2oaDjsh09JBBLH665G6xUl0Qs8FP6NWU+RNKrAGrlFhuccK
2ZwZFI7asR7zcoQsl4W/n+50SMgogkRokcoY8YM8+sDC70L+BbnzhubHtPmvVbty
3ivX8NtFbiMILZ3qsr2AWi7rTEkA7PiO2rfdzaQYiK03KV7ooz6BkfKnoSVB+WFx
76L+sn+r+36LaPgTzlSXsL7CxglqUM+PSLlRJ2yYwjEwqjBh9V1P3A3fNKpD9GZd
FQIDAQAB
-----END PUBLIC KEY-----
`;
    constructor(private http: HttpClient) {}

    public login() {
        // 暗号化
        var encrypt = new JsEncryptModule.JSEncrypt();
        encrypt.setPublicKey(this.pubKey);
        var encryptedPassword = encrypt.encrypt(this.password);

        // JSONをサーバにHTTP POST
        const httpOptions = {
            headers: new HttpHeaders({
                "Content-Type": "application/json"
            })
        };
        let param = {
            email: this.email,
            password: encryptedPassword
        };
        console.log("暗号化したJSON", param);
        this.http.post("decrypted_echo", param, httpOptions).subscribe(
            res => {
                const response: any = res;
                console.log("サーバからの復号結果", res);
            },
            error => {
                console.log(error);
            }
        );
    }
}
HTTP Proxyをたてる
サーバ(Spring Boot)はHTTP:8080ポートで起動しているので、ng serveを使ってHTTP:4200で起動する予定のAngularとはCORS(Cross Origin Resource Sharing)制約違反になって通信が出来ません。
ブラウザから直接サーバにリクエストするのではなく、プロキシサーバにリクエストを代行してもらうようにします。
プロジェクト直下に「proxy.conf.json」ファイルを作成し、以下の内容を記述します。
{
    "/": {
        "target": "http://localhost:8080",
        "pathRewrite": {
            "^/": ""
        }
    }
}
クライアント側の実装完了です。
動作確認
以下を実行してAngular側のHTTP:4200サーバを起動します。
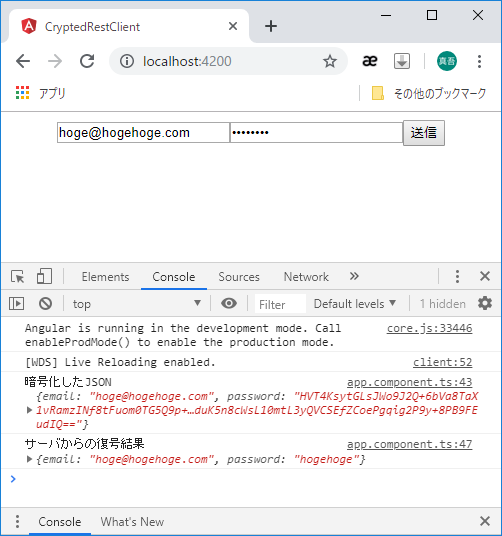
ng serve --proxy-config proxy.conf.json暗号化された送信データがサーバで復号されて帰ってきたらOKです。

まとめ
クライアント側でデータを永続化する際は今回暗号化したデータを保存することでブラウザ側には平文が残さずに済みそうです。
ただこのケースだと復号する為の秘密鍵はサーバにある為、クライアント側単体で復号が出来ません。
「クライアントで復号出来てはいけないデータ」を暗号化するのであればこの方法は強制力が強いです。

