HTTPS開発環境用、自己署名証明書の作成
(2020/09/18追記)
mkcertを使ってより簡単に完璧なSSL証明書を作ることができました。
ささっと開発用のHTTPSサーバを作りたい時はmkcert使った方が良いですね。
以下投稿内容だとAndroid7以上のChromeで接続出来ません。
すっかりHTTPS必須の時代になり、それに併せてPWA関連、Payment Request API等、HTTPS環境下でないと機能しないAPIが出てきました。
開発を簡便にする為にlocalhostへのアクセスであれば動作する措置が取られていたりしますが、それでもスマホ実機からサーバにアクセスする際はURLがlocalhostでは無くなる為エラーになってしまいます。
インターネットに出ている機器ならLet’s Encryptを使って無料でサーバ証明書を作れてもWANやLANの中の開発用PCだと簡単にはいきません。
動かせなければコーディングも出来ないので、大多数のブラウザで許されるオレオレ証明書を作り、開発環境をSSL化していこうと思います。

作業環境
- Windowsで作業実施。
- Cygwinで入れたopensslコマンド(1.0.2系)使用。
- C:\opensslディレクトリを作成し、作業ディレクトリとする。
- 設定ファイル「openssl.cnf」原本を汚さない為、作業ディレクトリに同ファイルをコピーする。
備考
- Chrome58以上に対応。CN(Common Name)の他、SAN(Subject Alternative Name)を設定(Chrome58以降、SANをサーバ所在として扱う為)
- OpenSSLバージョンが1.0.2系であればOSは不問。
- oepnsslの1.1.0系、3.0.0では未検証。(現時点の最新CentOS7.6を入れると1.0.2が入る。事実上1.0.2系がデフォルト。)
- Androidは6以下のみ対応。Android7以上では手作業でインストールしたCA証明書は信頼されない為、HTTPSサーバ証明書として使用出来ない。
手順
作業ディレクトリを整える
- C:\opensslディレクトリを作成。
- opensslコマンドが1.0.2系であることを確認。
C:\openssl>openssl version
OpenSSL 1.0.2m 2 Nov 2017- Cygwin環境の/usr/ssl/openssl.cnfをC\:opensslにコピー。
- 作業ディレクトリをカレントディレクトリに変更。
#dir     = ./demoCA     # Where everything is kept
dir = ./ # Where everything is kept- CA署名時に使用されるシリアルナンバーファイルを作成。
touch ./index.txt
echo 00 > ./serial
CA(証明書認証局)を作成
CA秘密鍵を作成。(パスワードは任意に入力、備忘する)
C:\openssl>openssl genrsa -aes256 -out ./cakey.pem 2048
Generating RSA private key, 2048 bit long modulus
.......................................................................................................................................+++
.......................................................+++
e is 65537 (0x10001)
Enter pass phrase for ./cakey.pem: (パスワードを入力して備忘しておく)
Verifying - Enter pass phrase for ./cakey.pem:
CA証明書リクエストを作成。質問事項は任意に入力のこと。CNのみHTTPSサーバのIPにしておく。(クライアントOSにCA証明書をインストールした後分かり易い為)
C:\openssl>openssl req -new -key ./cakey.pem -config ./openssl.cnf -out cacert.csr
Enter pass phrase for ./cakey.pem: (CA秘密鍵のパスワードを入力)
You are about to be asked to enter information that will be incorporated
into your certificate request.
What you are about to enter is what is called a Distinguished Name or a DN.
There are quite a few fields but you can leave some blank
For some fields there will be a default value,
If you enter '.', the field will be left blank.
-----
Country Name (2 letter code) [AU]:JA
State or Province Name (full name) [Some-State]:Tokyo
Locality Name (eg, city) []:Katsushika
Organization Name (eg, company) [Internet Widgits Pty Ltd]:適当な組織名
Organizational Unit Name (eg, section) []:適当な組織名
Common Name (e.g. server FQDN or YOUR name) []:192.168.0.5
Email Address []:適当なメールアドレス。届かなくてもOK

Please enter the following 'extra' attributes
to be sent with your certificate request
A challenge password []:入力無し、エンター
An optional company name []:入力無し、エンター
同ディレクトリにv3_ca.txtを作成し、以下の内容を記述。(X509 v3拡張領域に以下内容を入れる為作成する)
basicConstraints = critical, CA:true
keyUsage = critical, cRLSign, keyCertSign
subjectKeyIdentifier=hash
CA証明書作成。
C:\openssl>openssl ca -in cacert.csr -selfsign -keyfile ./cakey.pem -notext -config ./openssl.cnf -outdir . -days 3650 -extfile v3_ca.txt -out cacert.pem
Using configuration from ./openssl.cnf
Enter pass phrase for ./cakey.pem:
Check that the request matches the signature
Signature ok
Certificate Details:
        Serial Number: 1 (0x1)
        Validity
            Not Before: May 15 06:45:09 2019 GMT
            Not After : May 12 06:45:09 2029 GMT
        Subject:
            countryName               = JA
            stateOrProvinceName       = Tokyo
            organizationName          = 入力した組織名
            organizationalUnitName    = 入力した組織名
            commonName                = 192.168.0.5
            emailAddress              = 入力したメールアドレス
        X509v3 extensions:
            X509v3 Basic Constraints: critical
                CA:TRUE
            X509v3 Key Usage: critical
                Certificate Sign, CRL Sign
            X509v3 Subject Key Identifier:
                DF:87:A9:7F:EC:64:13:B9:C0:DF:04:2B:E6:72:D4:C9:72:4F:74:E7
Certificate is to be certified until May 12 06:45:09 2029 GMT (3650 days)
Sign the certificate? [y/n]:y


1 out of 1 certificate requests certified, commit? [y/n]y
Write out database with 1 new entries
Data Base Updated
確認の為、出来たCA証明書をテキストダンプし、以下3点を確認。
openssl x509 -in cacert.pem -text

     (中略)

        X509v3 extensions:
            X509v3 Basic Constraints: critical       <-- 確認1.critical、CA:TRUEが入っていること
                CA:TRUE
            X509v3 Key Usage: critical               <-- 確認2.署名用途である左記の記述が入っていること
                Certificate Sign, CRL Sign
            X509v3 Subject Key Identifier:           <-- 確認3.署名するサーバ証明書との関連を示す左記IDが入っていること
                DF:87:A9:7F:EC:64:13:B9:C0:DF:04:2B:E6:72:D4:C9:72:4F:74:E7
サーバ証明書を作成
サーバ秘密鍵作成。
C:\openssl>openssl genrsa -aes256 -out ./server.key 2048
Generating RSA private key, 2048 bit long modulus
..........................................+++
...................................+++
e is 65537 (0x10001)
Enter pass phrase for ./server.key:パスワードを入力して備忘しておく
Verifying - Enter pass phrase for ./server.key:
サーバ証明書リクエスト作成。個人用途なのでCAと同じ内容で構いません。CN(Common Name)のみHTTPSサーバのIPに設定。(Chrome以外はCNがドメイン検証対象)
C:\openssl>openssl req -new -key ./server.key -config ./openssl.cnf -out server.csr
Enter pass phrase for ./server.key:
You are about to be asked to enter information that will be incorporated
into your certificate request.
What you are about to enter is what is called a Distinguished Name or a DN.
There are quite a few fields but you can leave some blank
For some fields there will be a default value,
If you enter '.', the field will be left blank.
-----
Country Name (2 letter code) [AU]:JA
State or Province Name (full name) [Some-State]:Tokyo
Locality Name (eg, city) []:Katsushika
Organization Name (eg, company) [Internet Widgits Pty Ltd]:適当な組織名
Organizational Unit Name (eg, section) []:適当な組織名
Common Name (e.g. server FQDN or YOUR name) []:192.168.0.5
Email Address []:適当なメールアドレス。届かなくてもOK

Please enter the following 'extra' attributes
to be sent with your certificate request
A challenge password []:入力無し、エンター
An optional company name []:入力無し、エンター
同ディレクトリにv3_server.txtを作成し、以下の内容を記述。(X509 v3拡張領域に以下内容を入れる為作成する)IP.1にはHTTPSサーバを起動する予定のPCのIPアドレスを設定する。
[SAN]
basicConstraints = CA:false
keyUsage = critical, digitalSignature, keyEncipherment
extendedKeyUsage = serverAuth
authorityKeyIdentifier=keyid,issuer

subjectAltName=@alt_names
basicConstraints=CA:FALSE
[alt_names]
DNS.1=localhost
IP.1=192.168.0.5  <-- HTTPSサーバを起動するPCのIPにする
IP.2=127.0.0.1
サーバ証明書作成。
C:\openssl>openssl ca -in server.csr -config openssl.cnf -keyfile ./cakey.pem -outdir . -extfile v3_server.txt -extensions SAN -out server.crt -days 3650
Using configuration from openssl.cnf
Enter pass phrase for ./cakey.pem:
Check that the request matches the signature
Signature ok
Certificate Details:
        Serial Number: 2 (0x2)
        Validity
            Not Before: May 15 06:47:36 2019 GMT
            Not After : May 12 06:47:36 2029 GMT
        Subject:
            countryName               = JA
            stateOrProvinceName       = Tokyo
            organizationName          = 入力した組織名
            organizationalUnitName    = 入力した組織名
            commonName                = 192.168.0.5
            emailAddress              = 入力したメールアドレス
        X509v3 extensions:
            X509v3 Subject Alternative Name:
                DNS:localhost, IP Address:192.168.0.5, IP Address:127.0.0.1
            X509v3 Basic Constraints:
                CA:FALSE
            X509v3 Key Usage: critical
                Digital Signature, Key Encipherment
            X509v3 Extended Key Usage:
                TLS Web Server Authentication
            X509v3 Authority Key Identifier:
                keyid:DF:87:A9:7F:EC:64:13:B9:C0:DF:04:2B:E6:72:D4:C9:72:4F:74:E7

Certificate is to be certified until May 12 06:47:36 2029 GMT (3650 days)
Sign the certificate? [y/n]:y


1 out of 1 certificate requests certified, commit? [y/n]y
Write out database with 1 new entries
Data Base Updated
上記コマンド後、以下のエラーが出る場合はindex.txtを削除、touch index.txtをやり直し、再度上記コマンド実行で成功する。
failed to update database
TXT_DB error number 2
確認の為、出来たサーバ証明書をテキストダンプし、以下5点を確認
openssl x509 -in server.crt -text

(中略)

    X509v3 extensions:
        X509v3 Subject Alternative Name:      <-- 確認1.SANで自分のHTTPSサーバIPが設定されていること
            DNS:localhost, IP Address:192.168.0.5, IP Address:127.0.0.1
        X509v3 Basic Constraints:             <-- 確認2.CA:FALSE
            CA:FALSE
        X509v3 Key Usage: critical            <-- 確認3.Digital Signature
            Digital Signature, Key Encipherment
        X509v3 Extended Key Usage:            <-- 確認4.HTTPSサーバ用途
            TLS Web Server Authentication
        X509v3 Authority Key Identifier:      <-- 確認5.先のCAに署名されていること
            keyid:DF:87:A9:7F:EC:64:13:B9:C0:DF:04:2B:E6:72:D4:C9:72:4F:74:E7
パス無しサーバ秘密鍵作成。(パスが付いたままだとApache起動時にパスワードを聞かれてしまう、または起動に失敗する為)
openssl rsa -in ./server.key -out nopass_server.key成果物
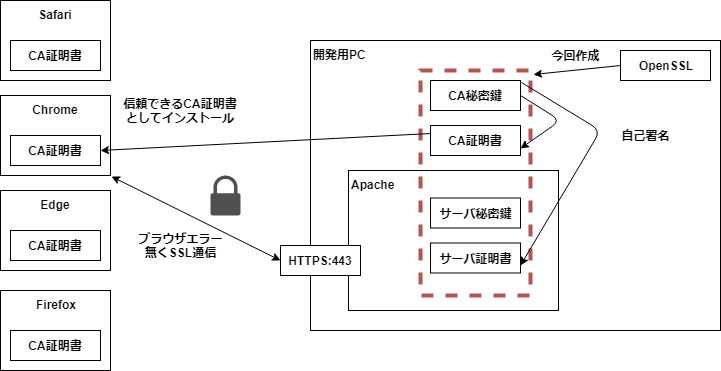
- CA秘密鍵:cakey.pem
- CA証明書:cacert.crt
- サーバ秘密鍵:nopass_server.key
- サーバ証明書:server.crt
が出来上がりました。これを使ってHTTPSサーバを立ち上げます。
- 1は新しいサーバ証明書を作るまで置いておくだけ、取りあえず不使用。
- 2はWebブラウザを起動するクライアント端末にインストール。
- 3,4はApacheに設定。
SSLCertificateFile "C:\openssl/server.crt"
SSLCertificateKeyFile "C:\openssl/nopass_server.key"
CA証明書はWindows、Mac、Android、iOSそれぞれの方法でOSにインストールします。Windowsの場合はファイルをダブルクリックして「信頼されたルート証明機関」に入れれば完了です。
一回作っておくことでApacheに限らずNginxやNode.jsで起動するコマンドHTTPサーバをHTTPS化する為の作業コストが目減りしますね。
CA証明書をOSに入れたのにChromeで信頼されない時は「chrome://restart」でChromeを再起動してみてください。
